Thursday, August 30, 2012

Enema - part deux

DO NOT READ THIS POST IF YOU HATE HEARING ABOUT POOP!

For all you pregnant women out there I'm sure you are well aware of one of the wonderful symptoms of pregnancy - CONSTIPATION, CONSTIPATION.  The word so nice I have to repeat it twice.

Constipation can range from mild to severe. I've experienced the whole range of constipation. Every since I got pregnant 6 months ago I went to the bathroom maybe every two days.  Before pregnancy every day. When I do go, I get little pebbles and I have to sit there for 30 mins or more to get those little fellas out.

Approximately 1 1/2 months ago, my constipation was so bad I had to call my Ob-gyn to see if I should go to the ER. I was in constipation pain, trying to push while sitting on the toilet for 12 hours. She recommended I try enema first. If that doesn't work I would have to go to the hospital and have them physically remove it for me. I sure hope the doctor is not cute in that case. But lucky me, I have a wonderful husband who was willing to put the enema solution up my behind. After 3-5 minutes, there was relieve and no hospital for me. Mr. T also cleaned up all the mess that I made in the bathroom, because the enema worked so quickly that I missed the toilet. You know you have a great husband when he's willing to clean up your - - - -.  However, my labia was really swollen and I had a little tear in my rectum. Ice-pack 15 mins on, 15 mins off and all was better.

Today it happened again. I figured it would because I haven't had a bowel movement for 4 days. This morning I had my Activia yogurt, three glasses of prune juice hoping to have something happen today. Around 5 pm, the little pebbles came out, but then it got stuck. Hit a roadblock. Literally backed up.  After 30 mins I stopped pushing then tried again, but it was not willing to come out.  Of course, by now I have hemorrhoid.  My rectum blew up like a balloon along with my labia. To make it worst I tore my rectum again leading to bleeding. No more pushing. Time for the enema. No need to rush to the store. Since our last episode, my husband stocked up the bathroom cabinet with enema. So I waited patiently for Mr. T  to come home while pacing the floor, doing my deep breathing.  When he opened the door, I said,

"Hi, Honey. Severe constipation today. I set up the bathroom floor and the enema bottle is all set to go."  

We were on to another great adventure, but it didn't happened as quick as it did last time. I had to tell Mr. T the bad news: He needs to PHYSICALLY remove it for me. Calmly, he said, " Gloves or no gloves?" As he went to get the gloves he heard me shout,

 "Never mind! I'm good."

 I think my poop was afraid of my husband because it decided to come out. I could hear Mr.T's sigh of relief as he walked to the bathroom from the kitchen with a pair of gloves in his hand.


Soft baby blocks & wreath

A while ago I was learning how to sew a straight line and came upon this very easy tutorial  from London Mummy on how to make a soft baby cube/block. You need to click on each image for step-by-step instructions.

Sew can do also have a great tutorial. Love the L-O-V-E sign language blocks.

L-O-V-E blocks by Sew can do


Below are the two blocks that I made. They are ultra-soft.

photo by petite brooklyn mom


Photo by petite brooklyn mom


I also made the following wreath from some yards and felt that I had lying around the house following  Danielle Burkleo's tutorial. I was in a wreath frenzy since it was around Christmas time. I made wreaths for all the doors in my apartment for all seasons. This one I will put on my bedroom/nursery.  


photo by petite brooklyn mom

DIY toys

I'm thinking of making toys for my baby, especially for the first 2 years or so because I know that eventually he/she will FORCE me (through endless crying, kicking, rolling around the floor.  I'm deeply hoping that won't happen) to buy them toys from an actual store!!!  

So here are some really cool toys that can be made from whatever you have in the house with some little extra that you have to buy, but still cheaper than purchasing an actual toy from the store. 


All that glitter water bottle
tutorial from Pink Pastachio


Water Sensory Bottle
tutorial from Spoonfed Baby


tutorial from Meet the Dubiens


Scavenger hunt/I spy bottle


 Making toys out of Cardboard boxes

Tutorial from ambrosia girl


Cereal box coin roller


Cereal box marble run


Baby toy slot box

Cardboard marionette

Marble Race Track


Toys that requires no work to make:

Cardboard box- Don't buy a cardboard box!!! That defeats the purpose of saving money. Use the cardboard box that the diapers come in when you buy in bulk or when your husband buys his big toys.   Just put the baby in there and he'll explore it on his own. 

If you want to make something out of the cardboard, take a look at Boys germ for great ideas.

Soda/water bottle are also great by themselves. Put it on the floor. Watch him use his gross and fine motor skills to kick or roll it. Line some up and he'll use one to try and knock them all down. 

You can also do a little bit of work by putting in water and dishwashing detergent (seal the cap so that it doesn't leak). Shake it up and watch him interact with it. Add food dye and see what happens!

Note: As with all toys, supervision is needed to ensure safety. Also make sure that the toys are age-appropriate for your kid and supplies that you use are safe for baba.


Wednesday, August 29, 2012

Neutral Baby

I actually love not knowing the gender of my baby in regards to what I sew, make or buy for it. My thinking changed from what should I make for my son or daughter to more of what should I make so that my baby will enjoy it disregarding the gender-theme color and patterns. I've found tons of fabrics that are gender neutral so that if we decide to go for a second baby I don't have to buy new clothes or toys.

Looking through some of the baby stores I'm happy that they feel the same way and are beginning to introduce more gender neutral products. I particularly like the products from Skip*Hop. Their products have fun patterns, but not in your typical bright colors that are overwhelming! However, they still stimulate interactions and creativity. Instead of hiding all your baby toys and gears when visitors come you actually want to leave them out because they are so cute.

Don't get me wrong, I have nothing against parents who dress their girls in pink and their boys in blue or has gender specific toys.  I just actually like funky clothes for my kids, like the skulls t-shirts, Nightmare before Christmas tutu, Bob Dylan onesie, etc. Before someone come up to me and say "OH, your baby is wearing pink/blue today. I thought you don't want that!", I will occasionally dress my kid in those colors especially if they are accompanied by some funky logo or if its not your typical shade of baby pink/blue. Or if they are given to me as a gift. Or if it's on dirt cheap discount and that's the only color they have. After all my bigger goal is to save money. I will also gladly accept hand-me-down clothes/gears in those colors since that mean FREE stuff; more money for COLLEGE! And I am willing to also accept team logo clothes that aren't the Yankees, Giants, or Jets. You just won't see that baby outside with it. He/She can vomit on it all it wants inside the house.

Baby Peanut

It's amazing how big my little peanut is getting, along with my ever growing belly.


0.45 cm at 6 weeks 1 day.


Getting bigger  at 1.79 cm at 8 weeks 2 days.


2.72 cm. at 9 weeks 4 days.


Baby Peanut blowing bubbles or smoking a cigarette at 12 weeks 5 days. 

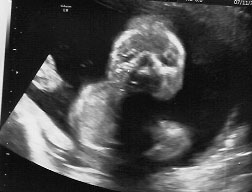
                                   Baby Peanut waving hello to the parents at 19 weeks 3 days.

Look at those adorable feet at 19 weeks 3 days. 

                                     
Baby Peanut staring straight at us with the mohawk hair at 19 weeks 3 days. 
My husband loves this sonogram. I personally am a little bit scared by it.


Tuesday, August 28, 2012

Stop kicking me!

HEHEHE...if you read my previous post you would definitely get the joke of this post title. 

No worries about kicks today. Been kicking since I woke up or should I say when it woke up thus waking me up.  I love the feel of the baby kicking, especially when I turn in bed.

My feelings might change in the following weeks when he/she gets bigger and the kicks become more powerful and often. My reaction then would be: " I LOVE YOU, but stop *@$# kicking me in my ribs and you know where!"

Are you in there?!

It might have been that I was too busy to notice my baby's fetal movements inside my tummy yesterday.  I was sewing the cloth wipes and designing/writing the contents of my blog almost the whole day. It occurred to me when my husband arrived home at around 6:30 pm that the baby hasn't kicked me since early morning. He/She normally starts with light kicks when I wake up and then starts to tumble and kick harder throughout the day, especially after I finish eating. Normally, the baby becomes really quiet when my husband gets home. I joked with my husband that when the baby acts up after it's born I'll just have to say his name and the baby will behave. 

We know based on reading baby books and researching the internet that at 26 weeks it's ok to have little or no movements for 1-2 days, but since it's been kicking every day for a month now, we couldn't help but wonder....

So Mr. T does what he normally does when he comes home. He cupped his hands together so it turns into an amplifier. Put them to his mouth and down towards the belly. He had a conversation with the baby. It went something like this:

"Hello, Baby. Are you in there? 
Why aren't you kicking today? 
Mommy is getting worried. 
She said she just started a blog about you and now 
you're not doing anything.
Kick mommy so we know that you're ok."


We both looked at the tummy for several minutes waiting for a response. Nothing. Several more minutes passed by...Then...a little light kick on the right side of my belly button...then it turned its body to say, "Hey, you woke me up!" and one more kick. AAAAHHH...All's well with the world!!


Monday, August 27, 2012

Cloth wipes

First burp cloths, wash cloths, and now cloth wipes. Figured since I'm on a roll, why not just make everything out of cloth, especially with really soft flannel fabric, for my baby's little behind. I know it will be lots of money for laundry, but we're also going towards the energy saving, hand wash version. Let me rephrase that. Money saving, not energy saving since I'll be using up a lot of it hand-washing them. I will also try out my husband's way of laundering using a contraption that he bought. I'll demonstrate it to you in the near future.

Cloth wipes tutorial from Joyful Abode - homemade cloth baby wipes.

My really quick tutorial:
1. Wash flannel fabric.
2. Cut out  7"x7" square.
3. Use zig-zag stitch to sew edges to prevent fraying.

Here is my version:


Photo by petite brooklyn mom


Photo by petite brooklyn mom


Another ultra quick cloth wipes tutorial: 
Steal some 100% cotton t-shirts from your husband or your own closet. Cut out squares, whatever size you like or comfortable with.  Done! No stitching necessary since fabric will not fray. 
Or you can cut two squares from different t-shirts to make wipe reversible and fun. This would involve sewing however. 
                      

You can use the cloth wipes with plain water or a simple homemade solution. The tutorial above has a homemade solution at the bottom of the page. Or you can watch the YouTube video below to make really cheap disposable paper wipes or just make a spray bottle with a solution and spray your cloth wipes before using it on that really sensitive baby behind. I can't tell you how well these solution work since my baby isn't here yet. However, I will make some and test it on my husband!


Baby Wipe homemade solution update: Made the solution from the above Youtube view yesterday using Burt Bee's shampoo/wash and Johnson's baby oil. Turns out great! Paper towels remained moist the whole day and still moist today. Has a really nice light scent from the baby oil, which I always love the smell of. I am using it to clean my dirty hands and as well as other body parts.  


Wash Cloths

If you're going to make burp cloth, might as well make your own wash cloths. Zaaberry and  2 Little Hooligans both have very simple tutorials on how to make them.

Etsy sells them as well. But why buy when you can make? Just wanted to link it so you get to see what it looks like and how easy it is to make.

Here is my version of it.  It looks like the one from Etsy. The dot minky (really soft, lush 100% polyester cloth) is not as colorful since I wanted to use it with variety of fabrics. 


Photo by petite brooklyn mom

Got a great bargain from Daffy's, which is going out of business. Bought a supersoft plush blanket (86"x 86") for $20 and made some more wash cloths.

Photo by petite brooklyn mom


Photo by petite brooklyn mom


Applique onesie


Since I have some fabric remnants I decided to cut out a dog from one of the fabrics and make it into applique to put on a onesie.

Crap I've Made and See Vanessa Craft  have very simple tutorial on how to make a appliqued onesie.

Quick tutorial:  Cut out any shape you like. Bond it to the onesie with fabric adhesive using an iron. That's basically it.  There are some good fabric adhesives out there including Heat and Bond Ultrahold .

I chose to also hand-stitch the edges of the shape to ensure that it stays in the wash since I've never used fabric adhesive before and not sure how it will turn out. Better safe then sorry. It took me a long time to hand stitch it, but if you're good with a sewing machine you can secure the edges that way. Will update you once I attempt the sewing machine path.

By the way, remember to wash your onesies and applique before the project so that it doesn't shrink on you later.


Photo by petite brooklyn mom

Update Sept.03.2012: I decided to make a pear applique today using just the "heat and bond ultra-hold" adhesive without stitching the edges.  I attempted to make a template by drawing a pear looking at the one on the fabric.

Should have signed my piece of art. Might be worth something one day!


Should look something like this. Identical,  right?!

I never claimed to be a great artist. Frustated, I consulted with the husband, who told me to make a copy of the fabric pear using the copier machine at 250% enlargement (in black & white to save the color inks!), and then cut out the pear. Not only did I married the sweetest guy ever; I also married a GENIUS! 

After that I followed the simple instructions from See Vanessa Craft.  The finished product:


Photo by petite brooklyn mom

I went on to make an elephant applique onesie:

Photo by petite brooklyn mom

"hello" bunting onesie : Requires hand-stitching the word, "hello" and also the string. You can also use a sewing machine to secure the buntings.


Photo by petite brooklyn mom

Photo by petite brooklyn mom

Stuffed giraffe

I stumbled across a wonderful website that made me want to literally make tons of toys for my future baby. This website was created by a father. His name is Joel. He makes stuff for his kids that are really simple and it cost nearly nothing to make. Joel makes toys out of cereal boxes!! Now that's my kind of guy. I mean craft.  Check out Made by Joel.

I made the stuffed giraffe, which is really cute and use just canvas fabric, sewing machine, and Painters opaque paint marker.  There are no instructions but you can tell by looking at the beautiful pictures of the giraffe how to make it. I will make the hippo next and redo the giraffe.

Here is my first draft of the giraffe. I need to make the giraffe bigger, especially the neck since I have to pull the fabric inside out. Apparently, the pen is non-toxic so baby can chew on the fabric. You just have to blow dry it or put it in the dryer for several mins to become permanent and washable. I don't know how well it keeps after washing though. I guess we'll have to see later. 


Photo by petite brooklyn mom


Burp Cloth

First thing that I made were burp cloths. I found out through endless internet research and browsing through Toys R' Us and Buy Buy Baby that they are cheaply made, not that pretty or way too expensive for something that my baby will burp into. I saw burp cloths on Etsy that looked like the ones below sell for $5 each. Way too expensive. So I purchased a yard ($4/yard) of fabrics from Joann's and some pre-folded cloth diapers ($12 for 10) and turned them all into beautiful burp cloths. Now you can just use the cloth diapers as burp cloths, but why not make them adorable at the same time. 

Here is the tutorial website that I made the burp cloths from Petite Lemon.


Photo by petite brooklyn mom

Photo by petite brooklyn mom


Photo by petite brooklyn mom

(Blue cloth diaper with both sides unfolded so that it can be used as a pad.) 

Other uses for these would be: diapering, nursing, pads for changing table/crib/bed/lap, cleaning up baby mess, household dusting, and car washing/waxing.